Its been a long time coming, but we have started the EI House build starting with the dining room table.
The goal was to create an epic centerpiece that would showcase what is capable with the right mindset and a little time. I detailed every step so others could replicate what the process and not make some of the mistakes I made without spending the weeks researching online. The table had to be big, bulky and monolithic in look and feel with locally sourced materials and finished utilizing zero ZOC materials.
First was sourcing the materials and getting what we needed for the project. It was a 2-month process of searching and waiting.
Table Top
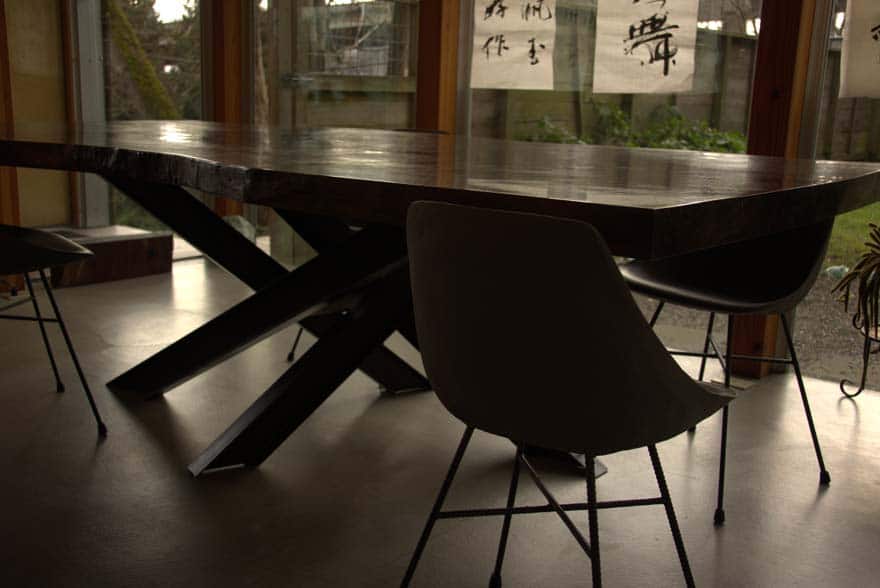
It had to be large with great character and sourced locally. My wife ended up finding a great large slab of Oregon Black Walnut from a local felled tree that was cut and kiln dried to nearly 3″ thick and was an odd shape with a unique edge, bur figures, knots, feather and crotch features. We found the slab at Live Edge Hardwoods, Adam and group cut, squared, routed & planed, filled most of the cracks and gaps with ecoepoxy and did the initial sanding through the grits up to 220. It is heavy, roughly 300lbs and it took 5 of us to move this 8′ 4″x~4′ x 2 3/4″ behemoth.
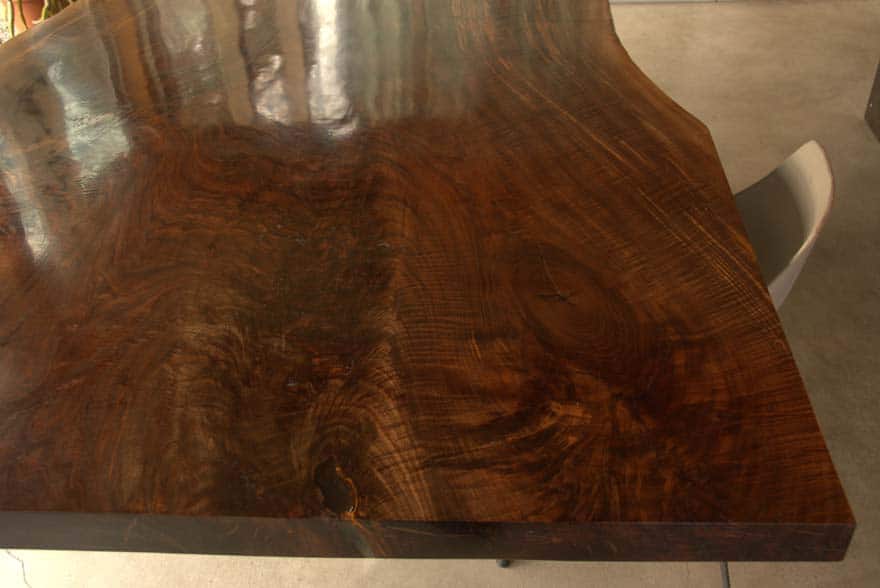
Table Base
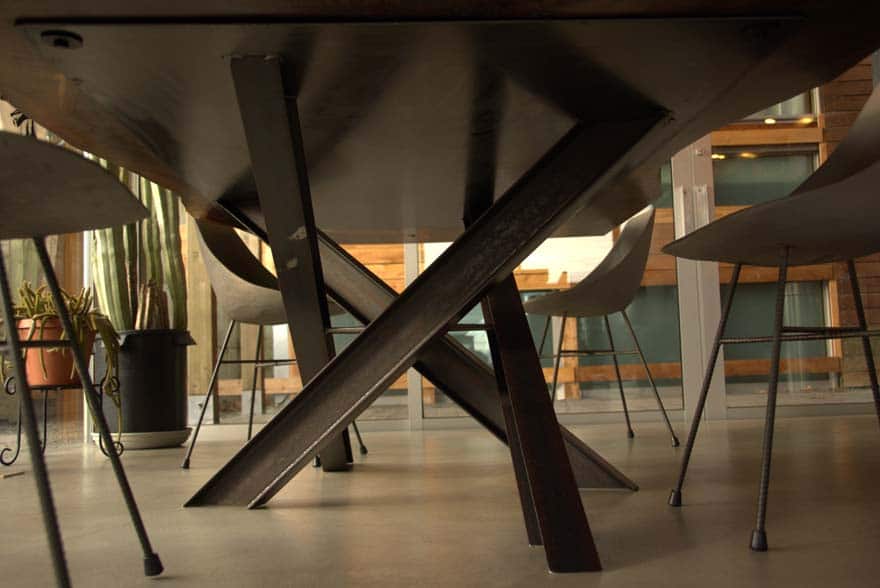
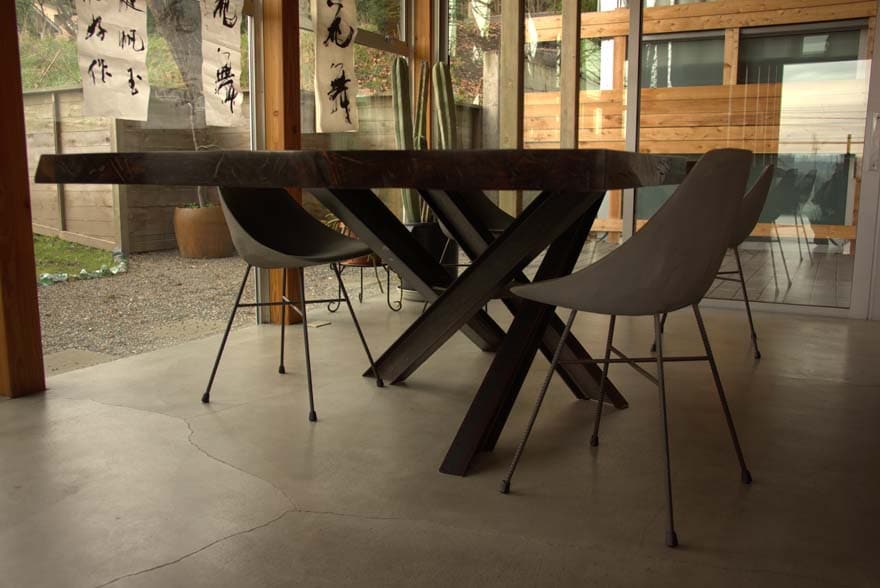
I came across a general idea for a table base that we liked. I wanted it to be abstract and look like it was floating on steel I-beams. After talking to all of the local fabricators, we decided to go with Pacific Sheet Metal James and his team had designed and fabricated some really nice pieces, and they were only 1/2 mile from our house. PSM created the shop drawings based on the specs of the table top size/weight and the design elements I was desiring to achieve. We came up with the idea to use a 4″ #7.7 locally sourced I-Beam and place a steel plate on the top with holes for mounting that would allow the slab to expand and contract over time. The table base came out at roughly 200lbs and it took 4 of us to move into the house. It was delivered in raw steel with most of the natural rust left in place. For the finish, we coated it in Carnauba wax.
Chairs
After lots of research, my wife really liked the Herman Miller Eames style of chairs. I eventually found a French artist group Lyon Benton that created a rebar based concrete chair called the HAUTEVILLE in a famous 50’s design ( Eames). No plastic or fiberglass in these chairs! They are Heavy but rather comfortable and warm up the longer you sit in them.
The Finish
Being that I wanted an all ECO no VOC finish on the table I asked that the items be delivered in the raw format and I would complete the finishes on site. For the table top I wanted a Wow finish, but none of the current methods suited our needs. I asked around to several woodworkers & finishers what they did to complete their works. Most where very commercialized and used current epoxies or varnishes to get their products complete and out the door in a reasonable time frame. I learned how violins where finished ad some of these had the most beautiful fishiness’s I have ever seen. Eventually, I came across people in the guitar industry that where open to try just about anything, some with extraordinary results. I asked a few people how some of the most extraordinary pieces in the past where created and still look great hundreds of years later. I was informed it was all “hand rubbed oil finish” in one manner or another and finished with wax. I chose to use a pure Tung Oil finished with Beeswax and Carnauba wax all provided by https://realmilkpaint.com I was told by the staff and several people online & in person that I would never be able to create a glossy finish that looked good on black walnut without using modern materials. That was a challenge to me! Can I achieve a semi-gloss or glossy finish with just oil and wax? So it began.

List of materials purchased:
– Real Milk Paint pure tung oil 32 + 16 oz
– Real Milk Paint citrus solvent 32 oz
– Real Milk Paint – 16 oz Soft Wax & Carnauba Wax
– 400, 1000, 1500 grit 3M sandpaper
– 2000-5000-7000 grit sandpaper
– Micro-Mesh pads 3×6 – 1400-12,000 grit sandpaper
– Sanding wedge (caused a lot of issues….)
– Plastic sheet – 10’x20′ 2mil (used only on the first few passes)
– Lint free microfiber 60 towels (we used them all!)
– Novus 7100 Plastic Polish Kit for the EcoEpoxy windows
– Ez-Lok – 3/8-16 – largest they have 400-6 inserts for base
– Black Smith Bolts – 3/8-16 Bolts – sq head – 1-1/4″ & 1 – 1/12 black oxidized – 2″ round washer
– Loctiite Epoxy extra Time – 6.85
———- Finish Materials Total $284.07 ———-
The Process: for a hand rubbed oil finish with tung oil, citrus solvent & Soft and Carnauba wax. Total Finish Time – Approximately: 100 hours
Day – 60 to 0 – *Part 1 – Find wood slab, cut, squared, have ecopoxy filled, routed & planed and sanded to 220 grit.
*Part 2 – Have local metal fabricator build the base to spec.
Day 1 – Slab delivery day. We placed the slab in our garage on steel horses to support until the base was complete. I received the cut offs from Live Edge and used one piece to test all of the planned finish and inserts on prior to completing on the main slab. It did not always translate from one to the other!
*Pre 1 – Sweep all surfaces with the bristle brush on the vacuum – sucks all dust out of pores.
*Pre 2 – Wipe all surfaces lightly with warm/hot water. No Puddles, just wet. Let dry – wipes off dirt, dust & unclogs pores.
*Part 1 – 75% citrus solvent / 25% tung oil – to go deep in the pores. Coat with the mixture until it starts to pool and no longer absorbs. Then wipe off excess. One coat on Sides & Bottom.
*Part 2 – 4 thin coats every 50 minutes – until 80% pools.
Day 2 – *Part 1 – Vacuum – dry sand to 400. Sand with the grain of the wood * Pulled up some tacky tung oil.. Wiped with damp cloth to remove the tung oil that smeared… Once dried, started Part 2
*Part 2 – Vacuum – then 50 / 50 tung oil – 4 thin coats every 50 minutes – until 80% pools, wipe off excess *** Did 3 coats – 90% fully saturated – the Sapwood pores took longest, as the pores are Large and took up everything we could give it! Used a Lot of Pools to get it fully saturated! It was cold so left for hour and half – Did sides & one coat on the bottom.
Day 3 – There where light lines that had a light white color, was recommended I take a damp new microfiber and wipe the surface lightly with the grain to get rid off the excess oil lines – This happened because it was 37 at night 50 in day. Will take longer to Cure the tung oil due to temperature and it was raining every day. The slab is in an unconditioned area of the house.
Day 7 – A few areas looks to be drying out – grey, lifeless areas – or it did not penetrate deep enough. *May need to 75% thinned layer over these areas (thin layer on cotton T-Shirt to apply) – 66% diluted with citrus solvent – let it sit for hour, wipe off. * Soaked right up! – may be because it is cold and tung oil is soaking deep in, leaving the surface no time to cure…. *Did the whole table. One section closest to the garage door to slightly cup up so I placed 50LBS of wood and weight on one corner to keep it from raising up to much as the top is drying faster than center and most of it soaking in to the center.
Day 8 – Did same 66% – just hit the Major drying spots. Used microfiber to apply.
Day 10 – Full wipe on top/sides of the table – 66% thinned layer coat of tung oil – This thing is thirsty! Big open pores, building up the thin layers. Used microfiber to apply,
Day 12 – 50/50 – Use old cotton shirt to apply (to not pull out of pores with MF) wiped against grains – Cold weather again, pulled some out of center, had to rub off thick hardening oil on the sides…
Day 14 – Was Very foggy outside and the nearest corner to the garage door the area turned white 🙁 Wiped off with citrus solvent and then put on thin coat. May not be fixable till in dining room with warmer temps. Here is how to fix
Day 15 – Base arrived, moved slab to dining room. Letting it sit on the top of base to adjust to a warmer / less moist area before I mount to base. Add Carnauba wax coating for the finish with a microfiber on the base. We intentionally left the rust in place to add an aged look to the steel.
Day 17 – *Surface started to dry with varnish looking finish and weird white spots on the surface (see the image before/after). I used soft bristle natural brush to scrub in and get rid of “white” build up on the surface (and in some grain) Then hard buffed with microfiber till no more white spots or varnish look (took 9 hours!) Weeping on the end grain edges due to Lots of tung oil in the wood and not curing due because of the cold/high humidity… Lesson Learned
Day 26 – Vacuum – Sand to 1000 – from here on it is “polishing with sandpaper” – Wet sand (slurry) with 50/50 Tung Oil – 3-4 rubs over all surface and sides. Sand with the grain of the wood direction – Wipe Off excess Slurry Against the Grain!!! ….. look for saw marks…. a few by the big window that need sanded down. *little swirl marks and line marks – Looks Much More Glossy and smooth!
Day 32 – Vacuum – Sand to 1500 – Wet sand (slurry) with 25/75% Tung Oil – 3-4 rubs over all surface and sides – sand with the grain of the wood direction. *First I went against the grain with the “stripes” then with the grain. Wipe Off excess that is not soaked in 30 minutes.. Should end up Silky Smooth… sand out Bottom scratches with 400 grit. Do the sides and bottom as well…
Day 36 – With help, we drilled in 1/2 holes and added EZ-lok brass hardwood inserts. We used 24-hour epoxy to make it easier for the brass inserts to go in with less friction and hold in place once the table and glue cures.
Day 39 – Wipe off dust – 3000 grit sand, the same process as above…. wet sand – 100% Tung. Then full coat wiped on after sanding – to fill in sanded areas and add layer )… Tung oil on sides and bottom – with grain… Wipe Slurry Against the Grain!!! Hand tighten base bolts…. * Light wet sanding scratches throughout, I think this is due to too much pressure & the rubber sanding bloc not being flat :-/ Need to do whole table by hand with 3000 grit. remove all of the starches. Use wet with only tung oil on paper. Sanded away all of the scratches. It was time-consuming (12 hours over 4 days), It did get rid of them all but it lightening the color/depth.
Day 43 – Put a very thin layer of tung oil on After the sanding… I think it was tung oil wet sanding streaks mixed with streaking from the finish building up and wiping off unevenly causing the layer on top to streak as it dries.
Day 46 – Wipe off dust – 5000 wet sand by hand with Tung! (no Rubber block) Look for Fine Scratches – medium pressure… With Grain – wipe clean then 100% Tung oil hand added thin coat after sanding – sides and bottom. Hand tighten base bolts… Same streaking issue had to go back and dry sand it all 🙁 Dry sand from now on.
Day 48 – Wipe off dust – 8000 grit Micro-Mesh – Dry sand – medium pressure – With Grain – wipe clean.
Day 49 – Wipe off dust – 12000 grit Micro-Mesh – Dry sand – light pressure – With Grain – wipe clean – Hand tighten base bolts…
*Part 2 – Layer of ultra thin Tung Oil to get rid of any patchiness and bring out some more depth. 75% CS /25% Tung
Day 50 – Layer of ultra thin Tung Oil too add another layer to the depth. 50% CS/50% Tung * Liked the color at this level!
Day 51 – *Part 1 – Buff the Epoxy Windows with Micro-Mesh – make glass like….. I did this on 6 of the largest windows… the rest were just too small.
*Part 2 – Use 3 layers of Soft Wax (thin coats, use sponge applicator, wipe off residue – let dry in-between 1-2 hours – hand buff) – this will go deep into pores/starches, and will not whiten in the pores/grains. The soft wax will act as a Resist for the harder final Carnauba wax. * First wax was Way to thick and it crackled in areas. I used a microfiber to buff it out, leaving streaks in the wax – I changed to using a cut up cotton shirt – will use these for the rest of the wax on/wax off. One wax on / wax off every 24 hours. 1. wax on thin with cotton shirt – small circular motions. 2. wipe off excess with the grain. 3. 90 minutes or so ( do swipe test https://meguiarsonline.com/forums/showthread.php?39350-How-to-tell-if-your-wax-is-dry-The-Swipe-Test ) if clear under the haze, wipe off with cotton. do not buff to hard for beeswax…
Day 52 – Soft waxing 2
Day 53 – Soft waxing 3
Day 54 – Use 2 layers of Carnauba wax – top sides and bottom (ultra thin coat with a sponge – wipe off residue – let dry overnight – hard buff) – apply as above and buff to shine with hard buffing.
Day 55 – Carnauba waxing 2 wipe on and wipe off with grain – DONE
Day 60 – Should be fully cured now, silky smooth, shiny and hard as a rock! – may have to add new layers of wax every 6 months (based on usage/ware) If all is well the color and tung oil should last for many years with no need for an update – But when it does it will just be a thin layer of 50/50 CS/Tung oil to bring out the color again, then re-wax.
Conclusion
I’m not a woodworking or finishing expert and the table top if not “perfect”, it has some micro scratches, burnt sanding spots, cloudy epoxy, cupping that can be pointed out, but the final product is simply stunning! Because it was sanded to 12,000 grit with the table un-waxed I was able to get an oil to a mirror finish. Wax only enhances the depth of the view into the wood and adds a light shell of protection. By far the best-looking finish I’ve ever seen on a table to date with warm chocolate, coffee, red and golden hues with a very deep chatoyancy throughout. In direct sunlight it is magical! We’re looking forward to the centuries of joyful use of this my family and friends will get while utilizing this masterpiece of modern art. You too can create a table in a VOC ECO-friendly way.
The table will set the stage for the quality of work we expect to go into every aspect of an EI.House.